In a modern home, you want to be able to watch TV, and preferably without interference, and even better in HD quality. And use the internet too.
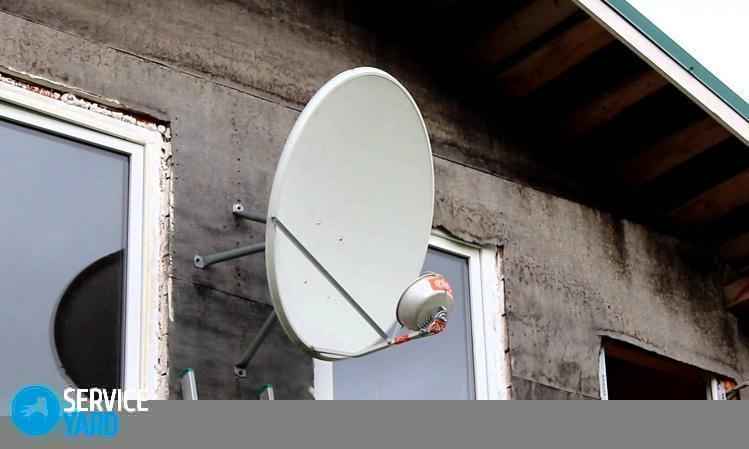
In this photo you see 2 antennas: a satellite dish for the TV and a 4G antenna for the Internet. Let's talk a little more about this.
Surely, many have long known how satellite TV works and what you need to start watching news in high quality. But for sure there are those who have not thought about it before, that's just for them this part of the article will be useful, where everything will be laid out in a simple and understandable language. In addition, let's talk about digital DVB-T2 television, which can be watched using a conventional antenna.
So, if you want to watch hundreds of channels with news, movies and other programs, you will need a satellite dish.

In this photo, the Lans plate, it seems, is 80 centimeters in diameter. The range of antennas starts from a diameter of 55 cm, if I'm not confused, and the larger the dish, the more confident the reception of the satellite signal. It is advisable to use 80-90 cm plates, then even in bad weather (snowfall or heavy rain) the picture on the TV will not “crumble”, that is, there will be no interference.
Antenna "in the hole" - there are small holes over the entire area of \u200b\u200bthe dish. This is necessary in order to reduce the wind load. Such a perforated antenna will not be swayed by the wind and certainly will not be torn off during a squall. It's a little more expensive, but it's justified.

The antenna must be installed so that it is directed to the satellite. Literally every millimeter counts. For example, the NTV + satellite is located in the south, so the antenna is hung on the facade that faces that direction. It is not necessary to hang the antenna on the house, it can also hang on a fence or on a tree, in some cases this is generally the only way to “catch” a signal - visibility must be direct, tall trees often interfere. When we install an antenna, we make sure to set it up and check the signal with a special device!
A so-called converter is fixed on a metal rack. It is needed to convert the satellite signal, it is to this little thing with an orange cap that the antenna cable is connected, which will go to the TV. Converters are different, some can only connect one cable (one TV), some two, some four. Perhaps there are models with more outputs, but I doubt that someone needs more than 4 TVs.
The satellite dish does not connect directly to any TV. There are 2 options:
At the construction stage, it is advisable to limit yourself to buying only an antenna with a converter, fix it on the facade or on the roof, adjust the position in order to receive a reliable signal from the satellite and bring the required number of cables into the house. Each TV is connected with a separate antenna cable and each TV needs its own receiver / module and its own smart card. By the way, each TV is also paid separately ... Therefore, most often the cable from the dish is connected to the living room, where a large TV will appear in the future.
Thus, after finishing the finishing, it remains only to connect the cable to the TV with the module or the receiver, you no longer need to climb onto the roof and touch the antenna.
Some time ago, broadcasting of digital television in the DVB-T2 format began. Modern TVs already have a built-in receiver for this type of signal. It differs from the good old antenna in that there is no "snow" and interference. If the reception is confident, the picture will be very clear.
 Reception is carried out on a similar antenna. At the time of writing, 20 channels are broadcast in digital format. These are 2 so-called multiplexes, 10 channels each. A multiplex is something like a package of channels that is broadcast on a specific frequency. These are on-air channels and they are broadcast free of charge.
If your TV does not have a built-in digital receiver, separate receivers are sold (“boxes” like those needed for satellite TV), you can connect such a box to any, even an old TV and watch TV channels in good quality.
You can read more about digital TV here: http://www.rtrs.ru/dtv/, and you can see the coverage area at this link.
Satellite is better, digital is free, and in general, all modern television is junk, but let's still figure out the pros and cons.
So, on the satellite side, 100% coverage - you can receive a satellite signal anywhere, there would be a dish. It can be difficult only in the forest among centuries-old tall trees, but even there you can try to find a “window” and adjust the antenna. The range of TV channels is also on the side of satellite TV - there are hundreds of these channels. Movies, sports, news, educational programs, cartoons - choose what you want, just don't forget to pay on time. Actually, the need to pay is the main disadvantage, and payment for each connected TV.
And on the side of digital DVB-T2 television, there is a lower cost of the antenna, a lower cost of the receiver (or if the TV is fresh, then the receiver is already built in), no subscription fee and the ability to connect any number of TVs to one antenna. However, you don’t have to pay a subscription fee for terrestrial channels on a satellite either, but on a satellite there is a choice, but not here. The disadvantages include not 100% coverage, there may not be reception somewhere or it will be too weak (see the link above) and only 20 channels. Maybe someday there will be more of them.
Many people put both antennas at once. Satellite is connected to a large TV in the living room, where you can watch movies, and a regular or digital antenna is connected to a TV in the kitchen or in the bedroom so that you can watch news on federal channels, for example.
Nowadays, good and fast Internet is already much more important than a TV, so let's talk about antennas for the Internet separately.

The photo shows a 3G/4G Proflink antenna. Why is she needed? What's good about her? Before answering these questions, it is worth delving a little into the problems of the mobile Internet.
If the mobile Internet on your modern smartphone is fast, and a regular USB modem is enough for a computer and the speed suits you, then you don’t need such an antenna, you don’t need to read further. But if everything works very slowly, and even with a good signal, the antenna can already help.
The principle of operation of 3G / 4G Internet is quite simple. In your or neighboring village, a telecom operator (Megafon, MTS, etc.) installs a base station. This is something like a large antenna to which your devices are connected - a phone or a modem. Your phone, the phone of the neighbor on the left, the neighbor on the right, the neighbor behind, across the street. They all need the Internet and they all share it with you. The fact is that the base station has a limited resource, bandwidth or "pipe" and it is divided approximately equally among everyone. Quite a bit, but not quite. There is the so-called concept of "radio resource", it is also limited. And this resource is needed the more, the worse the received signal on the subscriber device. Simply put, if your modem or phone is “bad”, there are only “one or two sticks”, the base station needs to expend more “strength” to provide you with good Internet access speed. If your signal is good or excellent, you need less strength = resources. These resources are also divided approximately equally, and all this is very rough and simplified.
The result is that those devices that have a better signal get a better speed. And this is only one side of the coin. Any mobile device, phone or modem is rather “weak”. If the operator's base station is a huge antenna on a mast or on the roof of a tall building, it emits a powerful signal, then the transmitter in your phone or modem is extremely small and it is difficult to “hear” the response signal from it to the base station. That is why your mail can be sent slowly, and uploading a video to Youtube is a whole problem.
Well, now let's compare, what do you think receives the signal better - your phone or tablet in your hands, or the antenna on the roof of the house? What radiates better? Obviously, a large antenna pointing towards the operator's base station will be in better radio conditions and provide you with a better internet experience.
In addition to better reception, and therefore higher network access speed, the antenna in the photo above boasts built-in WiFi. Those two small antennas on top are just wireless communication in the house and on the site. You can connect any device with WiFi to such an antenna, and besides it, there is also a regular Ethernet cable (by the way, power is supplied through it, this is POE technology).
Therefore, if the Internet in your home does not work well, it makes sense to think about the antenna. This is not a panacea, in the event of a severe overload of the operator's network, it will not help much, but even then the Internet will work better, because the signal will become better.
At the request of customers, I install Proflink antennas, which are manufactured in Krasnodar http://smarten.rf/antenna/ These antennas are built on high-quality components, differ from analogues in a more reliable "stuffing".
Satellite dish is a common but expensive pleasure. Many of us often thought about the question: is it possible to make such a multifunctional antenna on our own? Of course, it is quite possible! Most often, the question of making a satellite dish with their own hands is asked by people in order to save money or those who like to conduct experiments. Building a homemade TV-dish is not as easy as it seems. When installing it, you need to take into account not only the features of a particular model, but also even the smallest nuances: setting available satellites, reflection angle, and others. Today we will tell you how to make a satellite dish with your own hands from quite affordable improvised means. Let's look at the most common ways to make such a device.
When making a homemade satellite dish, do not forget to draw a detailed drawing of the device, taking into account all measurements and calculations of consumables, in order to get the desired result. It is thanks to your accurate calculations and values that you will save yourself from the risk of getting an irregular shape and similar unforeseen troubles.
The whole manufacturing process of such equipment is as follows:
Important! This is necessary in order to slightly facilitate the further process of work. Do not forget to follow the same interval between the elements of the matrix.
That's all the work. Such a satellite dish can be used for its intended purpose.
It happens that the location of the house does not allow the use of a parabolic dish, so you can build a similar antenna with your own hands. It is extremely important to take into account the following basic requirements for this homemade device:
Important! Make sure that the receiver does not come into contact with the metal handle of the umbrella, as this may cause a lot of noise interference. To protect the device from such troubles, we put plasticine in the zone of possible contact, which will serve as a kind of insulator.
It is not difficult to make such a satellite dish with your own hands, it is only important to follow the instructions and purchase one sheet of thin galvanized metal, the thickness of which should be a maximum of 1.5 mm, and the dimensions should be 100x100 mm. From such a sheet, you can make a homemade plate with a diameter of 80 mm.
Step-by-step algorithm of actions:
Important! Please note that each sector should be offset from the previous one by about 22 mm.
To make such homemade equipment, you will need a large inflatable ball, which will serve as a model for the frame of our future wire antenna.
The manufacturing technique is as follows:
Plexiglas is great for making a homemade satellite dish, since with moderate heating this material has excellent plasticity, due to which it can take absolutely any shape. For work, we took one sheet of plexiglass 3 mm thick and with a larger diameter than the diameter of the factory satellite device.
A step-by-step master class on making a satellite dish with your own hands from plexiglass:
Do-it-yourself satellite dish is ready! Now you can set up channels!
One author suggested the easiest way to do this. A satellite dish is used as the basis, because it is ideal in shape for focusing the sun's rays, formally it is designed to focus waves. In addition, such an antenna has an adjustable node, which allows you to change its angle if necessary and conveniently follow the sun.
This solar oven works very simply. When the sun's rays hit the plate, they are reflected from it and then focused at one point. As a result, the temperature rises sharply at this point, the principle is very similar to the operation of a lens.
Materials and tools for manufacturing:
- parabolic satellite dish;
- a board or timber to create a reliable foundation;
- saw for metal;
- wooden plank;
- mirror film;
- glue;
- scissors and other tools.

Step one. Making a platform for the oven
In order for the stove to stand securely on the ground and at the same time hold the pot, you need to make a good support for it. A board is suitable for these purposes, but it is better to use a beam, as it is heavier. The platform must be made as wide as possible, then the stove will be more stable and will not tip over even with a strong gust of wind. You need to cut off two pieces of the board and then screw the antenna to it with self-tapping screws as shown in the photo.


There are several tricks to improve the efficiency of such a furnace. Firstly, the bowler hat must be black, since if it reflects the color of the sun, the efficiency of such a device will be low. Secondly, the pot can be placed in a heat-resistant bag, as a result, a greenhouse effect will form in the bag and the efficiency of the furnace will increase significantly.


It is necessary to work with such furnaces in sunglasses, as there is a risk of burning the cornea of \u200b\u200bthe eye due to glare.


