I have already described one design of a microphone designed for the DPC, but its operation revealed a number of shortcomings, which are described below. So I tried to make a better model.
The result is two different microphones, one mono and the other stereo.
 |
 |
 |
 |
My first homemade microphone had a too uneven frequency response due to the resonance that occurs in the tube. In addition, it allowed recording only monophonic sound. It was decided to build a more perfect model of the microphone, but, as always, do without turning and milling.
In the course of reflection, several ideas came up for making a slot microphone tube without the use of machines, and even the tube itself.

The slot microphone tube can be made from large diameter washers. If two holes are drilled in each washer, then you can use two pins to assemble a multilayer sandwich, and adjust the size of the slots with small washers.
This idea, in my opinion, has only one significant drawback. In order to drill holes in each washer with sufficient accuracy, a small jig would have to be made.

If instead of washers you use clamps from old-type transistors, then you won’t have to drill anything at all. It remains only to collect the tube.

The disadvantage of a pipe assembled from standard clamps from transistors of the type P213 ... P217 is a lot of weight. If you use duralumin clamps from transistors of the KT801 type, you can get a fairly light tube. True, it will be difficult to place two microphone capsules in such a tube at once, so for a stereo wet phone you will have to look for another solution.

The slit microphone tube can be made from a narrow metal tape by rolling it into a helix on a template of the desired diameter. Then the width of the slots can be adjusted by changing the pitch of the screw.
Based on these ideas, I made two microphones - monophonic and stereophonic.
This time I omitted some details regarding the assembly of microphones and the manufacture of parts, since I have already covered them in detail.
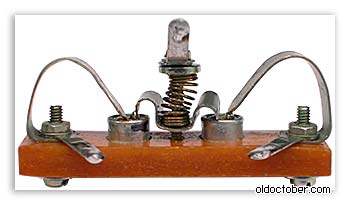
This is a drawing according to which a slit microphone was made from transistor clamps.

It turned out to be easy to assemble a microphone from clamps from transistors. Here's what was used for the build.


In order to make the appearance more presentable, I covered the body of the microphone, made from a syringe, with heat shrink tubing. First I seated the front part, and at the end of the assembly I inserted the cover and seated the tail part.

Here's what happened.
This is a drawing from which a directional stereo microphone was made from a metal tape.

Very few parts were needed for this microphone.


In order not to deal with painting, I covered the steel tape with heat shrink tubing, and then rolled it into a helical spiral pos. 1 on the body of a 10 gram syringe.
From the body of a 20-gram syringe, I made the microphone body pos.3, and the baffle pos.2 from the piston of the same syringe.
At this stage, you can drill three holes for attaching the tube to the body and cut the threads.

To reduce the length of the unshielded wires going to the microphone capsules, I extended the stereo cord with two small pieces of mono cord. The picture shows how it was done. Thick paper is used as insulation.

The microphone housing, as in the previous design, was covered with heat shrink tubing.

Another picture explaining the assembly order.

Here's what happened.
| Get the Flash Player to see this player. | ||
And here's how it works.
When testing the first pair of microphone capsules, it turned out that their frequency response differed too much. In anticipation of the market day, I even assembled a small stand to test microphones without using soldering. I bought a few more capsules for $ 0.4, so that I had plenty to choose from. But, the very first pair taken from this purchase turned out to be consistent in frequency response. I didn't experiment anymore.
It’s very difficult to do without a computer microphone now, you can’t use voice search without it, you can’t chat with a friend via video link. However, not all computers have built-in microphones, moreover, they often do not have very good sensitivity. You can solve this problem quite simply - assemble the microphone yourself.


(downloads: 206)


Preamble:
"Boney-M" (a very famous VIA in its time) arrived in Moscow on tour. At the airport, as usual,
the luggage with the equipment was “loved” and the reverb just disappeared (the device that makes the echo).
Well, there is nothing to do, let's go for a new one to the Mitinsky radio market. Check before buying.
To the microphone:
- Once.
From speakers:
- One, one, one...
Have taken.
Concert. They start to sing:
- Sunny...
From speakers:
- One, one, one...
The plot itself is below.
My cub from a broken tank calls me and complains that he has big problems on his laptop with a microphone, they don’t hear him, etc. etc. and that because of this it is impossible to shout commands in a tank battle - in short, I advised him to study the language of the deaf and dumb ...
However, my father's feelings after drinking beer somehow got to my conscience and I had to think, can the Chinese, with their sophisticated mind, come up with a USB microphone? Of course, it is known that Chelyabinsk men shout directly into the USB - but still ... It turned out that there is such a miracle - further as usual: basket, payment, shipment, waiting, receiving. 
The microphone itself was created in today's fashionable form factor "a la semicircular fitulence". 
The connection happened without problems and tricks, I tried to swear into it - in response I received the same thing. This is not a gogol-translate for you, which translates “fuck you” as “fuck you” - that is, there are no voice distortions, there is also no obvious acoustic connection - although it tries to “whistle”, the sensitivity is normal - you don’t need to scream. 
Otherwise, of course, you can read on the packaging how good it is - however, everything written there is an absolute lie.
1) connects via USB and blah blah blah HALF-TRUE
2) the presence of noise suppression filters HALF-TRUTH
3) the presence of the LED FALSE
4) the presence of a stand FALSE
The specifications are probably close by an order of magnitude, but for such a microphone it is unlikely (or rather, for its physical dimensions) and it is written that there is another 8 "cable - OBVIOUS FALSE 
However, this was not fundamental for me - the cub just needs to hold out until the holidays, and then with unwashed hands I will get into the laptop and bring my own microphone to life. In a word, I recommend to buy.
You can not only play around with voice search on Google (there are a lot of extensions for the Chrome browser for this, they are almost all the same, they use the same thing, but it seemed to me the most convenient extension “Voice search 2.02 - a microphone icon appears in all input forms by clicking on which can be said or dictated rather, for example, a search query as in the picture) but already with speech recognition somehow, but still work.
From Siri on Apple, I didn’t manage to achieve some kind of reciprocity, to the extent that it could be “used” for something serious, all the same, “imprisonment” for English affects, and I already know the addresses of the nearest dumplings. In any case, Google remains the leader in speech recognition, voices, it's a pity there is no way to use it programmatically and in Russian.
So the main weak point of microphones is sensitivity, and then of course the price.
Here is an example of how you can get around these two restrictions and for very little money, and if you have the details listed below, then for free, get a fairly sensitive home-made microphone. A photo of how to do it yourself, a description of the work and a microphone diagram below.
Made by me homemade microphone has high sensitivity and is able to perceive even the ticking of the clock at a distance of several meters. It also allows you to record high-quality sound using a computer. The recording quality also depends on the capabilities of the sound card in the system unit. In the design of the microphone unit, components of end-of-life electronics are used to the maximum.
An electret microphone can be taken from any old radio (in extreme cases, from a mobile phone). I used two microphones at once (+), which made it possible to significantly expand the sound perception diagram. The signal from the microphones, amplified by the low-noise transistor VT1, is fed to the operational amplifier DA1 (see Fig. drawing - microphone diagram). The amplifier output can be connected to ordinary headphones or fed further to signal recording and processing devices (desktop computer, laptop, etc.).
Drawing 1. Microphone diagram
The microphone amplifier is powered by the battery of any old mobile phone. Its battery life is tens of hours. You can use a free USB port on your computer to charge the battery. The amplifier can be left constantly connected to the port, since the charging current is small. I took the wire with the USB connector from the mouse. The connector at the output of the amplifier used 03.5 mm, - as for headphones - from any player, the volume control - too, and the rest of the details, including the SA1 power switch, - any small-sized ones.
All components should be placed on a small fiberglass board (photo 1 - above). I glued a small piece of foam rubber to the battery, and laid the board on top (photo 2). All this was well pulled off with electrical tape and tried on the regulator knob (photo 3). Then, to eliminate interference and interference, such a “sandwich” was placed in a tin screen, which was soldered to a common wire (photo 4, 5).
Microphones must be fixed in a piece of dense soft material. After that, in a piece of foam rubber (which, for example, is used for washing a car), I cut out a niche and inserted the entire block into it (photo b, 7), and pulled a fabric cover over it (photo 8). It is only necessary to provide slots for the plug, switch and volume control.
 1 PC. handmade felt homemade fabric flowers craft feltro…
14.05 rub.
Free shipping★★ ★★ ★★ ★★ ★★ (4.80) |
Orders (268)


