I liked small chips for simple chargers. I bought them from us in a local offline store, but as luck would have it, they ended there, they were taken from somewhere for a long time. Looking at this situation, I decided to order them for myself in small bulk, since the microcircuits are pretty good, and I liked them in work.
Description and comparison under the cut.
It was not in vain that I wrote in the headline about the comparison, since during the journey the dog could grow up mikruhi appeared in the store, I bought several pieces and decided to compare them.
The review will not have a lot of text, but quite a lot of photos.
But I'll start, as always, with how it came to me.
It came complete with other different parts, the mikruhi themselves were packed in a bag with a latch and a sticker with the name. 
This microcircuit is a charger microcircuit for lithium batteries with a charge end voltage of 4.2 Volts.
It can charge batteries up to 800mA.
The current value is set by changing the value of the external resistor.
It also supports the function of charging with a small current if the battery is heavily discharged (voltage is lower than 2.9 Volts).
When charged to a voltage of 4.2 Volts and the charging current drops below 1/10 of the set value, the microcircuit turns off the charge. If the voltage drops to 4.05 Volts, then it will again go into charge mode.
There is also an output for connecting an indication LED.
More information can be found in, this chip has a much cheaper one.
Moreover, it is cheaper with us, on Ali the opposite is true.
Actually, for comparison, I bought an analogue. 
But what was my surprise when the LTC and STC microcircuits turned out to be completely identical in appearance, both were labeled LTC4054. 
Well, maybe even more interesting.
As everyone understands, it’s not so easy to check a microcircuit, it also needs a strapping from other radio components, preferably a board, etc.
And just then a friend asked to fix (although in this context it’s more likely to redo) a charger for 18650 batteries.
The native burned out, and the charge current was too small.
In general, for testing, you must first collect what we will test on.
I drew the board according to the datasheet, even without a diagram, but I will give the diagram here for convenience. 
Well, actually the printed circuit board. There are no diodes VD1 and VD2 on the board, they were added after everything. 
All this was printed out, transferred to a piece of textolite.
To save money, I made another board on pruning, a review with her participation will be later. 
Well, the printed circuit board was actually made and the necessary parts were selected. 
And I will remake such a charger, for sure it is very well known to readers. 
Inside it is a very complex circuit, consisting of a connector, an LED, a resistor and specially trained wires that allow you to equalize the charge on the batteries.
Just kidding, the charger is in a plug-in box, but here there are just 2 batteries connected in parallel and an LED permanently connected to the batteries.
We will return to the native charger later. 
I soldered the scarf, dug out the native board with the contacts, soldered the contacts with the springs themselves, they will still come in handy. 
I drilled a couple of new holes, on the middle there will be an LED indicating the device is turned on, in the side ones - the charging process. 
I soldered contacts with springs, as well as LEDs, into the new board.
It is convenient to first insert the LEDs into the board, then carefully install the board in its native place, and only after that solder it, then they will stand evenly and evenly. 

The board is installed in place, the power cable is soldered.
The printed circuit board itself was developed for three power supply options.
2 options with a MiniUSB connector, but in installation options on different sides of the board and under the cable.
In this case, at first I did not know how long the cable would be needed, so I soldered the short one.
I also soldered the wires going to the positive contacts of the batteries.
Now they go on separate wires, for each battery its own. 
Here's how it turned out from above. 
Well, now let's move on to testing.
On the left on the board, I installed the mikruha I bought on Ali, on the right I bought it offline.
Accordingly, they will be mirrored on top.
First mikruha with Ali.
Charge current. 
Now bought offline. 
Short circuit current.
Similarly, first with Ali. 
Now offline. 
It was noticed that at 4.8 Volts the charge current is 600mA, at 5 Volts it drops to 500, but this was checked after warming up, maybe this is how the overheating protection works, I have not figured it out yet, but the microcircuits behave approximately the same.
Well, now a little about the process of charging and finalizing the alteration (yes, it even happens).
From the very beginning, I thought to just set the LED to indicate the on state.
Everything seems to be simple and obvious.
But as always, I wanted more.
I decided that it would be better if it was extinguished during the charge process.
I soldered a couple of diodes (vd1 and vd2 in the diagram), but got a small bummer, the LED showing the charge mode shines even when there is no battery.
Rather, it doesn’t shine, but flickers quickly, I added a 47 microfarad capacitor parallel to the battery terminals, after which it began to flash very briefly, almost imperceptibly.
This is exactly the hysteresis for recharging if the voltage drops below 4.05 Volts.
In general, after this revision, everything was fine.
Battery charge, red is on, green is not on and the LED is not on where there is no battery. 
The battery is fully charged. 
In the off state, the microcircuit does not pass voltage to the power connector, and is not afraid of shorting this connector, so it does not discharge the battery to its LED. 
There was also no temperature measurement.
I got a little over 62 degrees after 15 minutes of charge. 
Well, this is what the finished device looks like.
External changes are minimal, unlike internal ones. A friend had a 5 / Volt 2 Amp power supply, and it was pretty good.
The device provides a charge current of 600mA per channel, the channels are independent. 
Well, it looked like a native charger. The comrade wanted to ask me to raise the charging current in it. It couldn’t stand the native either, where else to raise, slag. 
Summary.
In my opinion, for a microcircuit for 7 cents it is very good.
Chips are fully functional and are no different from those purchased offline.
I am very pleased, now there is a supply of mikruh and I don’t have to wait until they are in the store (recently they disappeared from sale again).
Of the minuses - This is not a finished device, so you have to etch, solder, etc., but there is a plus, you can make a board for a specific application, and not use what is.
Well, in a toga, getting a working product made by yourself is cheaper than ready-made boards, and even under your specific conditions.
I almost forgot, datasheet, diagram and trace -
Progress is moving forward, and lithium batteries are increasingly replacing the traditionally used NiCd (nickel cadmium) and NiMh (nickel metal hydride) batteries.
With a comparable weight of one cell, lithium has a large capacity, in addition, the cell voltage is three times higher - 3.6 V per cell, instead of 1.2 V.
The cost of lithium batteries has begun to approach conventional alkaline batteries, the weight and size are much smaller, and besides, they can and should be charged. The manufacturer says 300-600 cycles can withstand.
There are different sizes and choosing the right one is not difficult.
The self-discharge is so low that they lie for years and remain charged, i.e. the device remains operational when it is needed.
And you can make yourself a simple or not very simple charger, depending on your experience and capabilities.

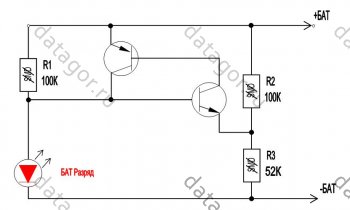
Rice. 5.
The required charging current for a particular lithium-ion (Li-Ion) and lithium-polymer (Li-Pol) battery is selected by changing the resistance Rx.
The resistance Rx approximately corresponds to the following ratio: 0.95/Imax.
The value of the resistor Rx indicated in the diagram corresponds to a current of 200 mA, this is an approximate value, it also depends on the transistor.
It is necessary to provide a radiator depending on the charge current and input voltage.
The input voltage must be at least 3 volts higher than the battery voltage for normal operation of the stabilizer, which for one bank is? 7-9 V.

Rice. 6.

Rice. 7. This small 5-leg chip is labeled "LTH7" or "LTADY"
I will not go into the smallest details of working with the microcircuit, everything is in the datasheet. I will describe only the most necessary features.
Charge current up to 800 mA.
The optimal supply voltage is from 4.3 to 6 Volts.
Charge indication.
Output short circuit protection.
Overheating protection (reduction of charge current at temperatures above 120°).
Does not charge the battery when the voltage on it is below 2.9 V.
The charge current is set by a resistor between the fifth output of the microcircuit and ground according to the formula
I=1000/R,
where I is the charge current in amperes, R is the resistance of the resistor in ohms.
Rice. eight.
Failure to comply with the first three points leads to a fire, the rest - to a complete or partial loss of capacity.
From the practice of many years of use, I can say that the capacity of the batteries changes little, but the internal resistance increases and the battery starts to work less in time at high consumption currents - it seems that the capacity has fallen.
Therefore, I usually put a larger capacity, which the dimensions of the device allow, and even old cans, which are ten years old, work pretty well.
For not very high currents, old cell batteries are suitable.

I put small batteries in children's toys, watches, etc., where there were 2-3 "tablet" elements from the factory. Where exactly 3V is needed, I add one diode in series and it turns out just right.
I put in LED flashlights.
Instead of the expensive and low-capacity Krona 9V, I installed 2 cans in the tester and forgot all the problems and extra costs.
In general, I put it wherever it turns out, instead of batteries.
At the expense of capacity, the Chinese usually lie and it is less than written.

Honest Sanyo 18650
A detailed description of 18650 lithium-ion batteries, making a do-it-yourself charging device, application nuances.
a) They exploded due to metallic lithium inside - with frequent charges, accumulations appeared on the element, leading to an explosion.
b) The battery was too bulky and inconvenient.
a) The battery often overheats.
b) The battery quickly loses its charge when exposed to negative temperatures.
a) + 10 - + 25 - ideal indicators. The battery does not tolerate too cold or hot rooms.
b) Store the battery at low temperatures when not in use.
c) At a temperature of + 30-45 degrees.
a) The case is too unreliable.
b) Parts of low quality, correct assembly technology is not always observed.
a) Storage of 18650 should be carried out at a charge level that does not fall below 50%. Complete discharge cannot be performed.
b) Not less than 10%.
Li-ion owners batteries 18650 are faced with the question of how much current to charge it. There are also difficulties in the correct operation, people do not know exactly what such batteries are afraid of, how to increase the duration of their work.
To independently assemble an electronic cigarette or a flashlight, you definitely need to study all aspects work with lithium-ion power supply.
Definition: Li-ion battery is a battery of electric current, which has become widespread among consumer electronics since 1991. It was this year that Sony Corporation presented the product to a wide market.
- As a power source. Such batteries are often used for various mobile phones, camcorders, laptops, for recharging electric vehicles or modern electronic cigarettes.
- The main drawback of the model was that the first developments literally exploded. This is due to the fact that manufacturers have placed inside the anode, consisting of metallic lithium. When a large number of charges and discharges occur, formations appear on the anode, leading to a short circuit of the electrodes. The result is a fire, and then an explosion. This issue has been resolved for now.
— To secure the design, the scientists replaced the core with graphite, and got rid of the problem with explosions. But difficulties remained with the cathode caused by the cobalt oxide construction. If the operational characteristics were violated, then the explosions were repeated. That is why it was necessary to ensure that the device was not subjected to overcharging. It was extremely inconvenient for users to constantly monitor the level of charge and the developers had to modify the device again. Modern models are safe. When the developers began to use lithium-ferro-phosphate batteries, they managed to get rid of this problem. A modern device is produced in such a way that overcharging and overheating is impossible.
- The charge is lost if the battery is exposed to low temperatures.
- If you do not lower the level of rarefaction below 50%, then it will not deteriorate.
Li-ion accumulators have a number of positive aspects because of which they gained popularity:
 Charger
 Look at the picture of the original charger device. A charger designed for lithium-ion batteries is very similar to a lead-acid type of battery. The difference is that the lithium-ion battery there are high voltages on each bank and severe voltage tolerance requirements.
It is interesting! The battery is called a "can" because of the similarity with aluminum cans, which produce soft drinks.
 "Banks"
 Most Popular Items nutrition with this form - 18650. The battery received this name because of its size: diameter - 18 mm, height - 65 mm. When is lead-acid charging batteries, minor inaccuracies in voltage indications are allowed. But with lithium-ion devices, everything is much more specific. When it happens charger, and the voltage increases to 4.2 volts, the voltage to the element must be stopped immediately. The error is only 0.5 volts.
 Chinese exercise
 There are a large number on the market Chinese chargers designed for batteries of different materials. Without compromising performance, ion batteries are charged with a current of 0.8 A. But the voltage in the bank will have to be very clearly controlled. When the value is 4.2 Volts, immediately stop charging. But in the event that the bank is embedded controller, then do not worry about it, because the device will do everything on its own.
Charging 4.2 Volts
As charger for a lithium-ion battery, a voltage stabilizer is used, current is limited at the very beginning of charging. It is necessary to use an exceptionally stable voltage, and limit the current at the very beginning of the charging process. Charging should be completed at the moment when the stable voltage is 4.2 volts, there is no current, or its value is very small - in the region of 5-7 mA.
 Oxidation
 When a rod of graphite, then the voltage should not exceed 4.1 V per cell. If this rule is neglected, the energy density will increase greatly, and the oxidation processes of the device will begin. As a result, the battery will fail. To avoid oxidation, modern models are equipped with additives - graphite not in pure form. But similar models can still be found by chance.
How to properly charge Li-ion batteries. Parallel connection of batteries.
For charging 18650 they acquire universal charging, and constantly use a multimeter to find out the necessary parameters. But such a device is quite expensive. The minimum price is 2700 rubles.
Instead, you can spend just a few hours and assemble a charger device on one's own. The advantages of such an assembly are low cost, reliability, automatic battery shutdown. All parts used for assembly can be found in the garage of any radio amateur. If something is missing, it can be bought at the nearest radio shop. You will have to spend a maximum of 300 rubles on components.
If a scheme correctly assembled, then there is no need for additional configuration - it will immediately be ready for use.
You need to use the following wiring diagram:
Scheme
The good news is that if you set stabilizer to the desired radiator, then the battery is charged without fear that the charge will light up. And this definitely cannot be said about Chinese chargers, which sin with this unpleasant consequence.
For high-quality battery charging, you should purchase good devices, which is already loved by many users.
Installed in laptops, cell phones and other household appliances. They are called the source of energy from which all electronics work. During operation, they require charging from special devices to ensure the operation of electrical engineering. Can I use DIY batteries for charging? Below is a report on this issue.
Having bought a mobile phone for the first time, many people think about how to charge it for the first time. There is an opinion that for a good and long operation, you should completely discharge and charge the device 3 times. But modern technology refutes this assertion. The process of a full discharge of li ion harms the device, which is why when buying a cell phone, we often see charged equipment at 2/3 of the capacity.
To avoid damage, do not fully discharge. The more lithium ions are on the electrode, the shorter the service life and the faster the li ion unit wears out.
Consider some rules for charging li ion, for long-term use.
The controller is a device that regulates the level of current and voltage from the source, protecting the power supply from premature damage.
The controller consists of a BMS protection circuit board and a small battery cell. The design is based on a microcircuit. Field microtransistors are used to control the protection during charging or discharging.
The controller circuit for charging li ion power supplies is shown in the figure
Data-lazy-type="image" data-src="http://chistyjdom.ru/wp-content/uploads/2018/03/li1.jpg" alt="123" width="700" height="307 "> 
The main functions of the controller are:
But not all types of controllers have absolutely all of the above functions.
Having a special education, you can do without a controller in the circuit, but you must be able to use an ammeter and a voltmeter. The voltage at the terminals must be at least the maximum charge, then the unit is 70% charged.
A protected battery is a power storage device in a shell with a small circuit board. It differs in that there is protection against overheating and overvoltage, as well as short circuit.
A protective electrical board is welded to the body of an unprotected li ion. After that, it is packaged in a shell. All options must be specified on the shell.
When buying a protected battery model, keep in mind that due to the presence of an outer shell, the dimensions are slightly increased compared to those previously mentioned. The height is more by 3-5 mm, and the diameter is up to 1 mm.
Advantages of li ion blocks:
An unprotected battery is an energy storage device hiding under the shell of an unprotected one. If you remove the outer shell, then there will be no unprotected battery under it. The outer packaging must indicate the parameters of the battery hidden under the shell.
In any scheme, a balancer and a controller board must be used to charge li ion batteries. They warn him against damage to the charger.
The operation of this circuit is based on the operation of a medium power T1 and an adjustable voltage regulator. Consider:
Data-lazy-type="image" data-src="http://chistyjdom.ru/wp-content/uploads/2018/03/li2.jpg" alt="123" width="578" height="246 "> 
When choosing a transistor, the required charging current is taken into account. Foreign or domestic NPN can be used to charge a small capacity battery. Install it on a heatsink if you have high input voltage.
The regulating element is T1. The charge current is limited by a resistor (R2). Use R2 power equal to 1W. Others may have less power.
LED1 is the LED responsible for signaling the charge of li ion. When the battery is turned on, the indicator diode lights up brightly, signaling a discharged state. And after full charging, the discharge indicator stops glowing. Despite the cessation of the glow of the light bulb, the battery continues to be charged with a current of less than 50 mA. To prevent overcharging, after charging is complete, disconnect the battery from the charge.
LED2 is the second LED used in the circuit for more precise control.
The choice of design depends on the purpose for which the blocks are used. For self-assembly of the structure, you should have the following parts on hand:
The circuit is designed to recharge one energy storage device, in order to use it for another type of charging, the output and charging current should be changed.
It should be remembered that all li ion power supplies differ in their sizes. The most popular are 18650. The balancer is an indispensable assistant in the chain. He copes with such a task in order to prevent the voltage from rising above the permissible limit.
You can assemble a charger for a li ion device with your own hands. In order to assemble a simple li ion charger, you need to have some experience and skills. Theoretically, homemade products can be made at home. In practice, this is an almost impossible task. The device does not always charge correctly from charging, and then the device will be useless. But before you do it, read a few rules:
If some rules are not followed, overheating, bloating of parts, emission of gas with an unpleasant odor, explosion of the device or fire may occur.
Branded batteries are equipped with special circuits that provide overvoltage protection, which does not allow exceeding the previously stated limit.
The charger circuit is shown in the figure:
Data-lazy-type="image" data-src="http://chistyjdom.ru/wp-content/uploads/2018/03/li3.jpg" alt="123" width="700" height="257 "> 
For correct use, the output voltage of the charger is set to U=4.2 V without connecting a battery for charging.
The indicator of work will be a diode, it is highlighted if the connected battery is discharged, and goes out when the battery is charged.
Charging collection:
Last time I considered replacing nickel-cadmium NiCd screwdriver batteries with lithium-ion ones. Now there was a question of charging these accumulators. 18650 Li-ion batteries can typically be charged up to 4.20V per cell with a tolerance of no more than 50 millivolts because increasing the voltage can damage the battery structure. The battery charge current can range from 0.1C to 1C (C-capacity of the battery). It is better to choose this value according to the datasheet for the specific battery. I used Samsung INR18650-30Q 3000mAh 15A batteries in the alteration of the screwdriver. We look at the datasheet-charging current -1.5A. 
The most correct way would be to charge lithium batteries in two stages using the CC / CV method (constant current, constant voltage-direct current, constant voltage). The first step is to provide a constant charge current. The current value is 0.2-0.5C. For a battery with a capacity of 3000 mAh, the nominal charge current in the first stage is 600-1500 mA. The second stage is charging the battery with a constant voltage, the current is constantly decreasing. The battery voltage is maintained within 4.15-4.25 V. The charging process will be completed when the current drops to 0.05-0.01C.
At this stage, the charger maintains a voltage of 4.15-4.25 volts on the battery and controls the current value. As the capacity increases, the charging current will decrease. As soon as its value decreases to 0.05-0.01С, the charging process is considered completed.
Taking into account the above, I used ready-made electronic modules from Aliexpress. Current limited CC/CV step down board on XL4015E1 chip or on LM2596. The board based on XL4015E1 is preferable, as it is more convenient in settings. 

Characteristics of the board on XL4015E1.
Maximum output current up to 5 Amps.
Output voltage: 0.8V-30V.
Input voltage: 5V-32V.
The board on the LM2596 has similar parameters, only the current is slightly less - up to 3 Amperes.
The charge management board for the lithium-ion battery was selected earlier. As a power source, you can use any with the following parameters - output voltage not lower than 18 Volts (for the 4S circuit), current not lower than 2-3 Amperes. As the first example of building a charger for lithium-ion batteries of a screwdriver, I used a 220 \ 12 Volt, 3 Ampere adapter. 

First, I checked what current it can give out to the feast of the rated load. I connected an autolamp to the output and waited half an hour. It gives out freely without preload 1.9 Amperes. I also measured the temperature on the radiator of the transistor -40 degrees Celsius. Pretty good, normal mode. 
But in this case, there is not enough tension. This is easily fixable with just one penny radio component-variable resistor (potentiometer) of 10-20 kOhm. Consider a typical adapter circuit. 
The circuit has a controlled zener diode TL431, it is in the feedback circuit. Its task is to maintain a stable output voltage in accordance with the load. Through a divider of two resistors, it is connected to the positive output of the adapter. We need to solder to the resistor (or solder it completely and solder it in its place, then the voltage will be regulated downward) which is connected to pin 1 of the TL431 zener diode and to the negative bus variable resistor. We rotate the axis of the potentiometer and set the desired voltage. In my case, I set 18 Volts (a small margin from 16.8 V to drop on the CCCV board). If your voltage indicated on the cases of electrolytic capacitors at the output of the circuit is greater than the new voltage, they may explode. Then you need to replace them with a margin of 30% voltage.
Next, connect the charge control board to the adapter. We set the voltage of 16.8 volts with a trimming resistor on the board. With another trimming resistor, we set a current of 1.5 Amperes, first we connect the tester in ammeter mode to the output of the board. Now you can connect the lithium-ion screwdriver assembly. Charging went well, the current dropped to a minimum by the end of the charge, the battery was charged. The temperature on the adapter was in the range of 40-43 degrees Celsius, which is quite normal. In the future, it is possible to drill holes in the adapter case to improve ventilation (especially in summer).
The end of the battery charge can be seen by turning on the LED on the board on the XL4015E1. In this example, I used another board on the LM2596, as I accidentally burned the XL4015E1 during the experiments. I advise you to do charging better on the XL4015E1 board.
I also have a regular charger from another screwdriver. It is designed to charge nickel-cadmium batteries. I wanted to use this regular charger to charge both nickel-cadmium batteries and lithium-ion ones. 
This was solved simply by soldering wires to the output wires (red plus, black minus) to the CCCV board.
The idle voltage at the output of the standard charger was 27 volts, which is quite suitable for our charging board. After I connected it in the same way as the version with the adapter. 
We see the end of charging here by changing the color of the LED (switched from red to green).
I placed the CCCV board itself in a suitable plastic box, bringing the wires out. 

If you have a regular charger on the transformer, then you can connect the CCCV board after the diode bridge of the rectifier.
The way to remake the adapter is within the power of beginners and can be useful for other purposes, as a result we get a budget unit for powering various devices.
I wish you all health and success in shopping and life.
You can see the process of working with a charger for a converted screwdriver in more detail in the video
The product was provided for writing a review by the store. The review is published in accordance with clause 18 of the Site Rules.
I plan to buy +27 Add to favorites Liked the review +28 +51


